forked from protonphoton/LJ
113 lines
5.0 KiB
Markdown
113 lines
5.0 KiB
Markdown
= Web Interface
|
|
|
|
You can load index.html file from your browser or have a webserver of your choice pointing to this directory.
|
|
|
|
Webserver is mandatory if you want :
|
|
|
|
- to remotely control LJ : imagine LJ can be installed in a dedicated computer/container with no easy access.
|
|
- to use the face tracking, say from a smartphone. That's Lasercam (a clmtrackr plugin).
|
|
|
|
== Simu
|
|
|
|
A laser simulator. Choose lasernumber and it will display redis points for current scene/lasernumber
|
|
|
|
|
|
|
|
|
|
== clmtrackr
|
|
|
|
|
|
[](https://www.npmjs.com/package/clmtrackr)
|
|
|
|
|
|
|
|
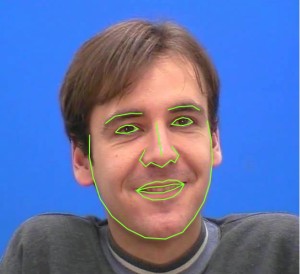
**clmtrackr** is a javascript library for fitting facial models to faces in videos or images. It currently is an implementation of *constrained local models* fitted by *regularized landmark mean-shift*, as described in [Jason M. Saragih's paper](http://dl.acm.org/citation.cfm?id=1938021). **clmtrackr** tracks a face and outputs the coordinate positions of the face model as an array, following the numbering of the model below:
|
|
|
|
[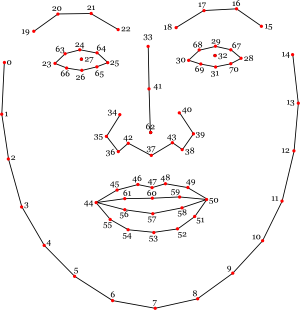](https://auduno.github.io/clmtrackr/examples/media/facemodel_numbering_new.png)
|
|
|
|
[Reference](http://auduno.github.io/clmtrackr/docs/reference.html) - [Overview](https://www.auduno.com/2014/01/05/fitting-faces/)
|
|
|
|
The library provides some generic face models that were trained on [the MUCT database](http://www.milbo.org/muct/) and some additional self-annotated images. Check out [clmtools](https://github.com/auduno/clmtools) for building your own models.
|
|
|
|
For tracking in video, it is recommended to use a browser with WebGL support, though the library should work on any modern browser.
|
|
|
|
For some more information about Constrained Local Models, take a look at Xiaoguang Yan's [excellent tutorial](https://sites.google.com/site/xgyanhome/home/projects/clm-implementation/ConstrainedLocalModel-tutorial%2Cv0.7.pdf?attredirects=0), which was of great help in implementing this library.
|
|
|
|
### Examples ###
|
|
|
|
* [Tracking in image](https://auduno.github.io/clmtrackr/examples/clm_image.html)
|
|
* [Tracking in video](https://auduno.github.io/clmtrackr/examples/clm_video.html)
|
|
* [Face substitution](https://auduno.github.io/clmtrackr/examples/facesubstitution.html)
|
|
* [Face masking](https://auduno.github.io/clmtrackr/examples/face_mask.html)
|
|
* [Realtime face deformation](https://auduno.github.io/clmtrackr/examples/facedeform.html)
|
|
* [Emotion detection](https://auduno.github.io/clmtrackr/examples/clm_emotiondetection.html)
|
|
* [Caricature](https://auduno.github.io/clmtrackr/examples/caricature.html)
|
|
|
|
### Usage ###
|
|
|
|
Download the minified library [clmtrackr.js](https://github.com/auduno/clmtrackr/raw/dev/build/clmtrackr.js), and include it in your webpage.
|
|
|
|
```html
|
|
/* clmtrackr libraries */
|
|
<script src="js/clmtrackr.js"></script>
|
|
```
|
|
|
|
The following code initiates the clmtrackr with the default model (see the [reference](http://auduno.github.io/clmtrackr/docs/reference.html) for some alternative models), and starts the tracker running on a video element.
|
|
|
|
```html
|
|
<video id="inputVideo" width="400" height="300" autoplay loop>
|
|
<source src="./media/somevideo.ogv" type="video/ogg"/>
|
|
</video>
|
|
<script type="text/javascript">
|
|
var videoInput = document.getElementById('inputVideo');
|
|
|
|
var ctracker = new clm.tracker();
|
|
ctracker.init();
|
|
ctracker.start(videoInput);
|
|
</script>
|
|
```
|
|
|
|
You can now get the positions of the tracked facial features as an array via ```getCurrentPosition()```:
|
|
|
|
```html
|
|
<script type="text/javascript">
|
|
function positionLoop() {
|
|
requestAnimationFrame(positionLoop);
|
|
var positions = ctracker.getCurrentPosition();
|
|
// positions = [[x_0, y_0], [x_1,y_1], ... ]
|
|
// do something with the positions ...
|
|
}
|
|
positionLoop();
|
|
</script>
|
|
```
|
|
|
|
You can also use the built in function ```draw()``` to draw the tracked facial model on a canvas :
|
|
|
|
```html
|
|
<canvas id="drawCanvas" width="400" height="300"></canvas>
|
|
<script type="text/javascript">
|
|
var canvasInput = document.getElementById('drawCanvas');
|
|
var cc = canvasInput.getContext('2d');
|
|
function drawLoop() {
|
|
requestAnimationFrame(drawLoop);
|
|
cc.clearRect(0, 0, canvasInput.width, canvasInput.height);
|
|
ctracker.draw(canvasInput);
|
|
}
|
|
drawLoop();
|
|
</script>
|
|
```
|
|
|
|
See the complete example [here](https://auduno.github.io/clmtrackr/examples/example.html).
|
|
|
|
### Development ###
|
|
|
|
First, install [node.js](http://nodejs.org/) with npm.
|
|
|
|
In the root directory of clmtrackr, run `npm install` then run `npm run build`. This will create `clmtrackr.js` and `clmtrackr.module.js` in `build` folder.
|
|
|
|
To test the examples locally, you need to run a local server. One easy way to do this is to install `http-server`, a small node.js utility: `npm install -g http-server`. Then run `http-server` in the root of clmtrackr and go to `https://localhost:8080/examples` in your browser.
|
|
|
|
### License ###
|
|
|
|
**clmtrackr** is distributed under the [MIT License](http://www.opensource.org/licenses/MIT)
|