| .docker | ||
| clitools | ||
| doc | ||
| ethertools | ||
| examples | ||
| libs3 | ||
| plugins | ||
| server | ||
| templates | ||
| www | ||
| .gitignore | ||
| configure.py | ||
| configureUI.py | ||
| docker-compose.yml | ||
| LJ.conf | ||
| LJ.py | ||
| main.py | ||
| OSC3.py | ||
| README.md | ||
| visualiser-darwin | ||
| visualiser-linux-nomsaa | ||
| websocket_server.py | ||
LJ v0.8.2 'fireandforget'
By Sam Neurohack, Loloster, Cocoa
LICENCE : CC BY
LJ is like a video projector where you fire images and forget. Lasers are dangerous : you can really fire real world objects. That's why you really shouldn't forget your lasers and go drink a beer.
As content creator, it's damn easy to send frames : LJ do the heavy lifting for up to 4 lasers live actions. Think creative like games, Laser "battles", planetarium, sharing available lasers in demoparties for competition,...
LJ has 5 main components :
- Frame generators to one or more lasers. You probably want to use/code a 'generator'. Generators can be program "plugins" managed by LJ or you can feed the "connectors" directly. Remember with laser : one frame = one polyline, like in LOGO.
- A "tracer" per etherdream/laser that take its given point list, correct geometry, recompute in laser controller coordinates, send it to its controller and report its status to the "manager".
- A "manager" that talk to all tracers (which point lists to draw, new geometry correction,...), handle IOs (webui functions, OSC commands,...) and plugins.
- A web GUI in html, css, and vanilla js. Yes, there is a builtin simulator, so you can create without actual lasers. This UI can be used in a tablet, computer, whatever. If you want a webserver, it's "bring your own". Locally, you can open www directory and load html files.
- Frame connectors. If you don't want to talk directly to the network database (redis) for your pointlists, use a 'connector'. Each "tracer" is instructed to get one of the avalaible pointlist in redis.
"Frames connectors" are :
- OSC (port 8002)
- Websocket (port 9001)
- Redis keys (one key per laser)
All derivatives you can think of like :
- Clitools is very powerfull : tunnel -> kaleidoscop -> color cycler -> redis connector.
- PureData (wip via UDP)
- Netlogo (text outputs are piped to clitools)
- ...
Scenes and pointlists.
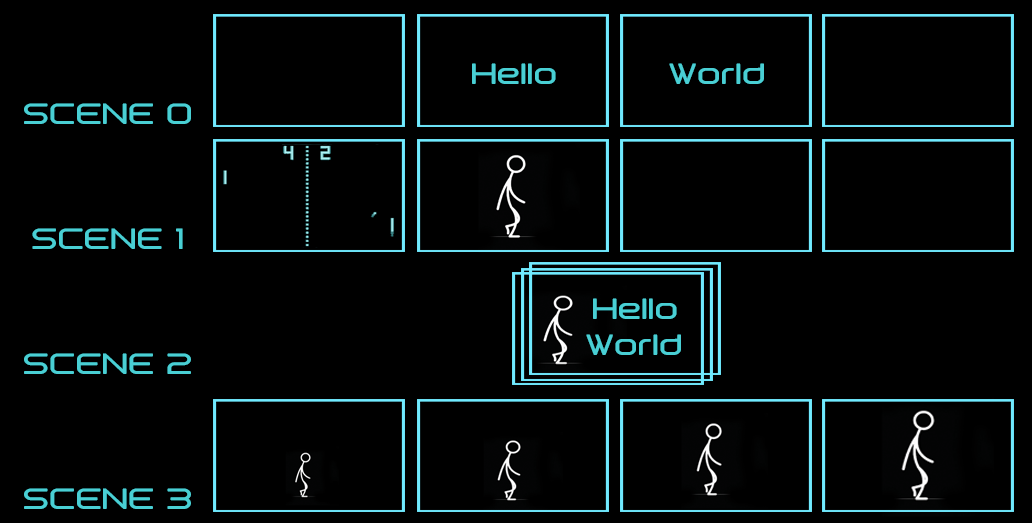
LJ accept up to 4 groups = virtual "scenes" of 4 "pointlists" each (= one pointlist per laser), so up to 16 pointlists can be sent to redis at anytime from anywhere in the network. The idea behind this is to easily share actual lasers. Imagine in demo party :
Erica needs 4 lasers, that's the 4 pointlists of "scene" 0. Paula and Jennifer use only 2 lasers each, so they can share "scene" 1. And so on..
To change current scene used by lasers/tracers use the command : /scene/scenenumber/start 1
How talk to frames connectors
One "frame" must be formated like /pl/scenenumber/lasernumber pointlist.
Example :
/pl/0/0 "[(150.0, 230.0, 65280), (170.0, 170.0, 65280), (230.0, 170.0, 65280), (210.0, 230.0, 65280), (150.0, 230.0, 65280)]"
Use the same syntax if you send your pointlist directly in redis : "/pl/0/0" is the key and keyvalue is "[(150.0,..."
Every point must be : (x,y,color). Color is the hex color #FFFFFF in decimal.
You can't specify an output framerate. It depends on your pointlist and laser mirrors scanners :
- if you draw a simple + single object like a oneline you'll get thousands fps.
- Longer pointlists are longer to draw by laser mirrors.
Inside "clitools" every point is [x,y,color]
See command reference for extensive documentation, but /pl is the only one you need to draw something. The webUI is here to masquerade all these commands.
Requirements
Computer :
- 4 threads+ processor
- RAM 4 Go
- Gigabit ethernet
Laser(s) :
- ILDA capable
- DAC : Etherdream
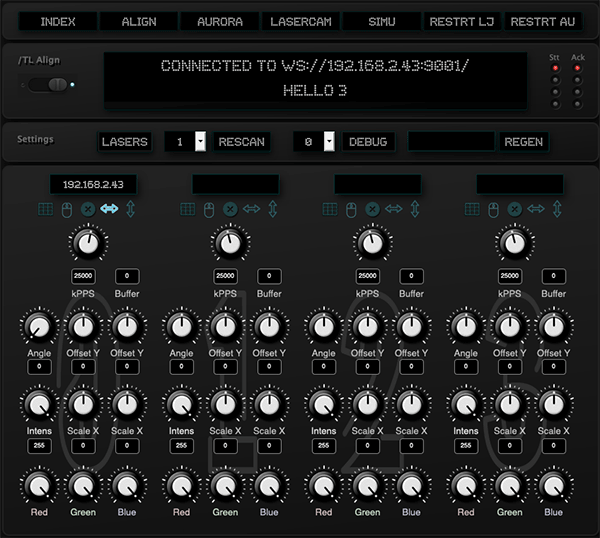
Web User Interface :
- any computer, phone, tablet,...
RJ 45 IP network : gigabits only !! wifi and wired 100 mpbs doesn't work well with several lasers. Seriously : if you experience frame drops you need to upgrade your network and use a dedicated computer to run seperately main program from plugins, youtube,...
Important : for best performance LJ is meant to run in a dedicated computer especially with multiple lasers and highly multitasked load : if you watch video, use live webcam face recognition, webui simulator,... and run LJ on the same computer, well you need a bunch of cores. If you don't, spread the load : you can use webui on a tablet, the livecam on a phone, run pointlists generators on another computer,...
The server/network/webUI idea allows to spread cpu intensive tasks on different cpu cores and especially give tracers enough cpu to feed etherdreams DACs smoothly. Of course all this can happen in one computer if you have enough cpu/computers/network ressources.
It's obviously overkill for one laser in a garage, but for several laserS games events, laserS art, laserS competition, laserS planetarium,... LJ will handle the complexity. Content providers like artists, demomakers,... just need create plugin in whatever langage, send the points to redis.
LJ is tested with Firefox, supports Linux and OS X. Windows is unkown but welcome, if someone want to jump in.
Features among many others.
- Intensity and kpps live modification.
- Some Lasermapping ('alignment') like in videomapping.
- OSC and websocket commands. Very cool : LJ can script or be scripted.
- Python3
- Web User Interface in your browser : open www/index.html. Javascript is needed. By default it connect to localhost. If you want to control remotely, you need to change the uri line in LJ.js.
- Live WebUI extras : change debug level, restart plugin, rescan DACs,...
- Status update every 0.5 seconds : every etherdream DAC state, number of buffer points sent,...
- "Optimisation" points automatically added, can be changed live for glitch art. Search "resampler" commands.
- A compiled version for os x and linux of nannou.org etherdream+laser emulator is included. For more informations, like license see https://github.com/nannou-org/ether-dream
- Webcam live face display (trckr).
- Resolume OSC client.
- Artnet receiver plugin, another possibity to script LJ.
- Ableton link time synchro support.
- Maxwell laser synth emulation plugin. Work in progress
- Plugins list auto start, see line in LJ.conf : autostart = artnet
- user.py plugin code example
Install
- Linux Buster : in LJ directory, type in a terminal window :
cd server ./install.sh
- OS X : you need brew already installed, then :
brew update brew upgrade brew install redis cd server type all install.sh commands beginning line 4. An OS X install script soon !!
- KVM : an ISO is available here : https://www.tmplab.org/wp-content/lazer-iso.zip
Postinstall for all :
You probably want redis bound to all network interfaces :
- locate redis.conf
redis-cli INFO server | grep config_file
Macos : arm : /opt/homebrew/etc/ intel : /usr/local/etc/redis.conf
-
comment the bind line
-
redis-cli CONFIG SET protected-mode no
The configure script to enter your etherdreams IPs,... is launched during install. You can use anytime, i.e if your network/etherdream setup change : python3 configure.py
- Webserver ?
A webserver is useful if you want to use the webUI remotely. Bring Your Own Webserver.
To run
Correct launch order is :
- Switch on Dacs/Lasers (emulator or IRL)
- Redis server, usually automatically started at boot (if redis is a service) or you launched manually : redis-server &
- LJ, see below.
- Load/reload webUI page from disk in a browser (www/index.html). Javascript must be enabled.
- Run a builtin plugin or your generator, to send pointlists in redis.
A typical LJ start is :
python3 main.py -L numberoflasers.
Use also -h to display all possible arguments, like -v 1 (or 2) for debug informations.
CASE 1 : the laser server computer, where LJ runs, is the same that the computer running a generator/plugin :
1/ Run LJ
python3 main.py -L 1
2/ Check in your client code if the laser server IP is the good one
Run your client
3/ to monitor redis server, there is an app for that (redis-manager/medis/...) or : redis-cli monitor redis-cli --stat redis-cli then ask for the key you want like : get /pl/0/0
CASE 2 : Server and Client computers are different :
1/ Say the laser server computer (running LJ) IP is 192.138.1.13, the client computer is 192.168.1.52, First remember to check on the server computer, if the redis server is listening to the right IP : edit /etc/redis/redis.conf
2/ Launch LJ with -r argument : python3 main.py -r 192.168.1.13 -L 1
3/ If the webUI is launched on "client" computer, use the configure.py
4/ run a client/plugin on client computer, like :
node nodeclient.js
5/ to monitor redis server use redis-manager/medis/... or :
redis-cli -h redisserverIP monitor
Client Side : Program your own "plugin"
The server approach is based on redis, so you can write and run your laser client software in any redis capable programming langage (50+ : https://redis.io/clients). An external program that just send pointlists to redis is a "client". If you want some interactions from the webUI, like text status area support, crash detection, autostart,... it's a "plugin" and some default code is needed. LJ and plugins signaling is over OSC.
- Read all this readme ;-)
- Generate at least one pointlist array (say a square) with enough points, one point is likely to fail for buffering reason.
- Feed your point list array in string format to redis server. i.e use "/pl/0/1" redis key to feed scene 0, laser 1. See /pl/ command in command reference below how to send your pointlist to i.e /pl/0/1 redis key.
- Tell LJ.conf your plugin configuration : OSC port and command line to start it.
- At least a plugin must reply /pong to OSC request /ping and must quit after an OSC command /quit.
Currently the WebUI (www/index.html) is static.
Plugins
LJ comes with different plugins in python 3 :
- artnet receiver : port 6454
- custom1 and square.py are programming examples.
- Aurora : Display basic shape/text. Say you want a word in front of starfield. For text, fill the input form and it's displayed. One word / laser.
Client side dope mode for python 3 generators : How to use lj23
lj23 have many very useful functions to not reinvent the wheel for advanced points generation "client" side : layers, sprites, built in rotations,..
4 Great TRICKS with lj23 :
First open custom1.py and learn how to declare different objects. custom1.py is a 2D shape example in 3D rotation (red/green anaglyph rendering) that use 2 layers : one for left eye and one for right eye. custom1 is a copy of square.py
1/ How to have another laser drawing the same thing ?
That's a destination problem : just add another destination :
Dest1 = lj.DestObject('1', 1, True, 0 , 1, 1)
Dest1 will also send layer 0 points to scene 1, laser 1
2/ Different layers to different lasers ?
Say because of too much points you want Left element drawn by scene 0, laser 0 and right element by scene 0, laser 1
First define a different object/layer for each drawn element :
Leftsquare = lj.FixedObject('Leftsquare', True, 255, [], red, 255, 0, 0, 0 , True) # Left goes to layer 0
Rightsquare = lj.FixedObject('Rightsquare', True, 255, [], green, 0, 255, 0, 1 , True) # Right goes to layer 1
Define 2 destinations :
Dest0 = lj.DestObject('0', 0, True, 0 , 0, 0) # Dest0 will send layer 0 points to scene 0, laser 0
Dest1 = lj.DestObject('1', 1, True, 1 , 0, 1) # Dest1 will send layer 1 points to scene 0, laser 1
3/ Different layers to one laser ?
You should consider adding all your points to one layer, but same as 1/ it's a destination problem, just add another destination with the same scene/laser for this layer
Dest1 = lj.DestObject('1', 1, True, 1 , 0, 0) # Dest1 will also send layer 1 points to scene 0, laser 0
4/ I want to animate/modify anything on the fly : I'm doing a game and suddenly my hero change color.
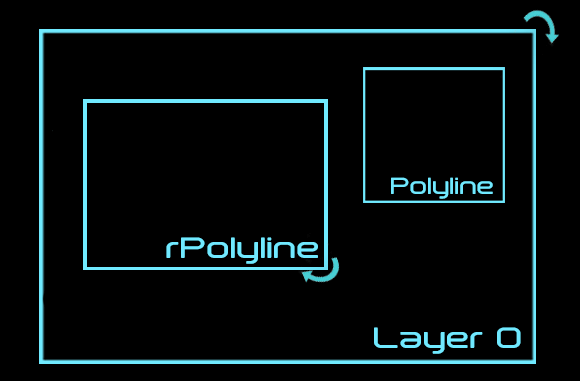
It's a drawn object problem : there is two kind of drawn ojects :
- "Fixed" objects : you generate points in 2D from 0,0 top left and 500,500 is bottom right. Say Hero is a Fixed Object, you can directly change value of
Hero.name, Hero.active, Hero.intensity, Hero.xy, Hero.color, Hero.red, Hero.green, Hero.blue, Hero.layer, Hero.closed
- "Relative" Object : is a kind of laser sprite : your points in 'objectname.xy' has to be around 0,0,0. The other properties let you describe the actual position (xpos, ypos), resize,..
i.e for a character "PNC" vanishing in one point declared as a "Relative" Object, you can decrease resize parameter : PNC.resize
PNC.name, PNC.active, PNC.intensity, PNC.xy, PNC.color, PNC.red, PNC.green, PNC.blue, PNC.layer, PNC.closed, PNC.xpos, PNC.ypos, PNC.resize, PNC.rotx, PNC.roty, PNC.rotz
Same for Dest0 if it's a destObject, properties are : Dest0.name, Dest0.number, Dest0.active, Dest0.layer, Dest0.scene, Dest0.laser
DrawDests() will take care of all your declared drawn elements/"objects" and Destinations to generate a point list per scene/laser sent to redis. In client point of view a "pointlist" is the sum of all its declared "layers".
Nannou etherdeam simulator aka visualiser
2 compiled nannou visualisers are included, one for Linux, one for macOS. It's pretty old version but much more compatible with "old" processors/computer.
To use this visualiser as one of LJ's lasers, use configure.py to set one laser to the IP of the computer running the visualiser. Relaunch LJ. One visualiser per computer.
Todo
(Doc in Progress)
- A grid style warp correction process in webUI.
- IP change should not need a LJ relaunch
- Way faster WebUI simulator.
Networking
You need to update LJ to your network/etherdreams IPs. Be sure to check command arguments : python3 configure.py
LJ is network based and this is critical and flickering reason #1 if not managed properly, especially if you have several lasers.
Our "always working solution", as we regularly move our gear for different venues :
-
We use static network configuration. Our Etherdreams controllers have static IPs defined in their SDcard from 192.168.1.1 to 192.168.1.9.
-
Because wifi will always finally sucks for many reasons, our computers (LJ server and plugins) are gigabits wired with IP 192.168.1.10 and after. Don't trust end user gear marketing on wifi. We have a big gigabits switch for the laser only lan. We provide Internet through wifi on a different network like 192.168.2.x if really needed.
-
Again, even if etherdreams are 100 Mbits, we use gigabits gear.
By default LJ uses on 127.0.0.1 (localhost) :
- A websocket on port 9001 for WebUI interaction.
- The redis server on port 6379 ('RediServerIP').
- An OSC server on port 8002 for remote control via OSC and plugins.
- Some OSC clients defined in LJ.conf to forward commands to defined plugins.
The need for a dedicated computer to act as "laser server" usually depends on how many lasers you want to control and your main computer load. If you seen flickering with small point lists, try the dedicated computer idea and/or stop process interfering like redis monitoring,...
LJ is meant to be on a closed wired IP network dedicated for laser purpose. There is no https, authentication, account management, security... Add a wifi/internet bridge at your own risk : some dude can scan your network and ddos LJ server and/or etherdream controllers ruining everything. You're responsible for networking. Recommended setup is computers and etherdreams are connected to a gigabit switch.
Glitch art
For nice lines and angles all user pointlists are automatically resampled by tracers. There is 2 cases defined for resampling strategy : short and long distance between 2 points.
short distance : has one step : (1.0, number repetition at destination position). 1.0 = 100% = end point of the line between the 2 points. For example : (1.0, 8) means the end point will be repeated 8 times.
long distance has 3 steps : (0.25, 3), (0.75, 3), (1.0, 10) : means an extra point at 25% is created and repeated 3 times, another at 75% repeated also 3 times and destination point is repeated 10 times.
For glitching experience you can change resampling strategy live with "resampler" command. See command reference. [short distance, long distance] = [(1.0, 8),(0.25, 3), (0.75, 3), (1.0, 10)]
Colors
LJ is compatible with TLL and analog modulation. Each point color is an int value, wich is simply the hex color in decimal. Example : white = #fffff = 16777215
Ether dream DAC
This program suppose that the ether dream is configured in a certain way especially for its IP address. We write an autoplay.txt file inside an SD Card within the ether dream DAC, with the following lines you can adjust i.e for pps or fps. Yes, there is a builtin DHCP client in the ether dream DAC but if you run multiple lasers, having a fixed dedicated network makes you focus on laser stuff.
/net/ipaddr 192.168.1.3
/net/netmask 255.255.255.0
/net/gateway 192.168.1.10
/ilda/pps 25000
/ilda/fps 25
See links section for great etherdream managing tools.
About hardware setup, especially if you have several lasers : ILDA cables are insanely expensive. For each DAC, buy a very small ILDA cable and RJ 45 cable, all DAC goes to a local switch and only one long cable to your You may also consider the Power Over Ethernet 'POE' option. Buy a POE splitter and connect everything to the ether dream fixed near your laser. You can have then a simple and very long network cable and use a Power Over Ethernet injector or switch close to the driving computer. Beware some vendors use 24V POE Injector : POE injectors and splitters must match.
Ethertools directory
2 useful and always working tools from j4cdac github repository : sitter and talk
- Sitter will display all real etherdreams available on the network and their state (playing, idle,...). python sitter.py or use the compiled version (for macOS).
- Talk : will draw a 4 colors square. python3 talk3.py
Settings
(Doc in Progress)
Settings webui is self explanatory. As LJ is controlled via OSC you can build your own interface (see command reference)
You can use a midi controller (16 knobs recommended) to change settings. The midi controller like beatstep can be connected to any "computer" in laser IP network. On this computer, run Miredis to relay events to LJ server computer (python3 miredeis.py -q 8002 -o ljserverip)
Midi implementation :
- Midi channel is used as laser selection : midi channel 0 is for laser 0,...
- Midi CC (control change) are used to change all LJ parameters.
- See miredis.json to see what cc number control what parameter or change them to your taste.
- Miredis : https://git.interhacker.space/protonphoton/miredis.git
Software controllers examples :
- Midi tools (https://mountainutilities.eu/miditools)
- Lightning DmxControl. Select Map midi in menu (https://lightning-dmxcontrol.com/lightning-dmxcontrolpro)
- TouchOSC template (LJpad.touchosc in templates directory)
Links
Generic :

There is a nice websocket debug tool : websocat.
Troubleshooting
Try these steps in this order ;
- Use talk3 in ethertools directory : this ensure your computer can connect to the etherdream. See ethertools chapter in this readme. If talk3 doesn't works, check the hardware, connections,...
python3 talk3.py -i etherdreamIP
-
You should see "connected to yourLJserverIP" on webUI. If not : LJ is not started / reload webpage / your network configuration is bad / a wrong IP in the configure parameters : python3 configure.py.
-
Switch to simu page. If you don't see anything : check redis server or your points in redis doesn't respect pointlist formatting (see command reference).
-
Check Leds : for each IRL lasers the two sets of must be green at startup and laser should display their number or the pointlist you want.
-
If talk3 works but you don't see your points : click on the Grid icon in Align page. This will override your pointlist and display squares. If Grid works : recomputed points by tracers are "bad" with given values in LJ.conf.
"Bad points" ?
- too small movement : some lasers (with small angle like 40°) won't display anything if zoomx/zoomy are too small. Increase zoomx / zoomy in LJ.conf. Try 50-100 values.
- off center : check in LJ.conf centerX and centerY. Reset them to 0.
- not enough points.
Don't kill your scanners : becareful with kpps setting.
The reset button copy the LJ_template.conf to LJ.conf.
LJ commands reference
All these commands are available via OSC (port 8002) or websocket (port 9001)
/pl/scenenumber/lasernumber value : value is the pointlist to draw as string. Example : /pl/0/0 "[(150.0, 230.0, 65280), (170.0, 170.0, 65280), (230.0, 170.0, 65280), (210.0, 230.0, 65280), (150.0, 230.0, 65280)]"
Use the same syntax if you send your pointlist directly in redis : "/pl/0/0" is the key and value is "[(150.0,..."
Every point must be : (x,y,color). Color is the hex color #FFFFFF in decimal.
/scale/X/lasernumber value
/scale/Y/lasernumber value
/swap/X/lasernumber value (0 or 1)
/swap/Y/lasernumber value (0 or 1)
/angle/lasernumber value : increase/decrease angle correction for given laser by value
/loffset/X/lasernumber value : change X offset of given laser by value
/loffset/Y/lasernumber value : change Y offset of given laser by value
/kpps/lasernumber value : live change of kpps /intens/lasernumber value : increase/decrease intensity for given laser by value. Needs analog modulation laser
/red/lasernumber value (0-255) : /green/lasernumber value (0-255) : /blue/lasernumber value (0-255) : /intensity/lasernumber value (0-255) :
/client or /noteon < 8 : change client displayed for Current Laser 23 < /noteon < 32 : PL number displayed on webUI simulator
/grid/lasernumber value (0 or 1) : switch given laser with grid display on or off
/black/lasernumber value (0 or 1) : set given laser to black on or off
/emergency value (0 or 1) : set all lasers to black on or off
/ip/lasernumber value : change given laser IP i.e '192.168.1.1'
/resampler/lasernumber lsteps : change resampling strategy (see glitch art), for given laser lsteps is a string like "[ (1.0, 8),(0.25, 3), (0.75, 3), (1.0, 10)]"
/scene/scenenumber/start 0 or 1 : tell all tracers to use given scene
/scim : change webui simulated laser.
All command beginning with a declared plugin name are forwarded automatically to given plugin : "/nozoid whatever" will be forwarded to nozoid client.
/forwardui "uicommand arg" : display one word on webui. There is 2 lines, first line (/status or /redstatus) and second line (/line1 or /redline1). Examples of "uicommand arg" :
/status hello
/redline1 Error
Leds colors for each DACs :
DAC IP is in LJ.conf but no connection to dac -> leds are red
DAC state "stt" :
IDLE -> blue
PREPARE -> cyan
PLAYING -> green
DAC answers (ack) :
ACK -> green
FULL -> orange
INVALID -> yellow
LJ python3 plugin command reference
See beginning of ljlayers.py in libs3